

That relentless, rhythmic dripping from a leaky showerhead isn't just an annoyance keeping you awake at night—it is a massive waste of water and money. The good news? You can absolutely tackle this fix yourself over a weekend.
Before you grab your wrench, you need to play detective. The exact timing of the leak tells you exactly what is broken.
Step 1: Diagnose the Leak
Look closely at when the water is escaping to determine your repair track:
-
The Leak Happens When the Faucet is ON: If water sprays or trickles out of the sides uncomfortably while you are showering, mineral scale and sediment have likely clogged the tiny spray holes. You just need to clean or replace the showerhead itself.
-
The Leak Happens When the Faucet is OFF: If the showerhead drips constantly even when the handle is turned completely off, the culprit is a worn-out faucet cartridge (the internal valve mechanism that controls water flow). You will need to swap it out for a new one.
The DIY Toolbox
Gather your gear before you get started. Depending on your diagnosis, you will need:
Repair Track A: Fixing a Clogged Showerhead (Leak is ON)
If mineral buildup is forcing water out of the wrong places, follow these steps to clear it:
-
Remove the head: Make sure the shower handle is off. Grip the showerhead and turn it counter-clockwise to unthread it from the wall arm. If it's stubborn, wrap a damp washcloth around it for extra grip, or use your pliers gently so you don't scratch the finish.
-
Soak away the scale: Peer inside the showerhead to check the rubber O-rings and mesh screen. Submerge the entire showerhead in a plastic bowl filled with white vinegar for one to two hours. The acid will dissolve hard water minerals.
-
Scrub and rinse: Pull it out, give the nozzles a quick scrub with your nylon brush, and flush it with cold water.
-
Tape and reassemble: Clean the metal pipe threads coming out of the wall. Wrap the threads clockwise with one or two loops of thread-sealing tape. Screw the showerhead back on by hand until it's snug.
Peer Note: If it still leaks or misbehaves after a thorough vinegar bath, the internal seals are likely shot. Save yourself the headache and simply thread on a brand-new replacement showerhead.
Repair Track B: Replacing a Leaky Faucet Cartridge (Leak is OFF)
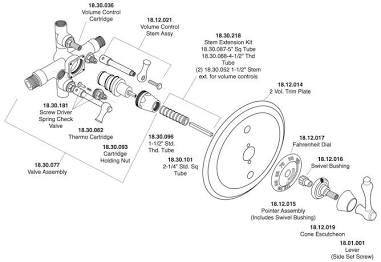
When a shower drips continuously while turned off, water is slipping past the internal seals. Because you are opening up the main water line, order is absolutely critical here to avoid turning your bathroom into a swimming pool.
Follow this precise sequence to swap out the cartridge safely:
Once everything is screwed back together tightly, turn your main water supply back on. Test your handiwork by running the shower and shutting it off firmly a few times. If you have marched through both tracks and that stubborn drip persists, you may have a cracked valve body deep in the wall—at that point, it's time to call in a licensed plumber.