

Project Overview
Working Time: 20 - 30 minutes
Total Time: 20 - 30 minutes
Skill Level: Beginner
Draining your home's plumbing pipes is not a common task, but it may be needed from time to time.
There are several reasons why this might be necessary, such as dealing with a water hammer issue, preparing a house for winter when it will be unoccupied, or making major plumbing changes like replacing or extending the main lines.While it might seem challenging, the process is actually quite simple.Let’s explore when you may want to do this.
Water Hammer
Water hammer, also known as hydraulic shock, happens when there is a loud banging sound in the pipes when you turn on or off a faucet or when an appliance suddenly starts or stops the flow of water.
This occurs because air is trapped in the pipes, causing the water to move back and forth and hit the pipes or the structure.Even with air chambers designed to reduce this effect, too much air in the system can cause ongoing issues.The solution is to drain the system and refill it.This ensures that the air is limited to the designated air chambers.
Seasonal Shutdown
Draining the plumbing system is an important part of preparing a home for the winter, especially if it will be empty during the colder months.
When water freezes inside the pipes, it can expand and cause them to burst, leading to significant water damage and costly repairs.
Major Plumbing Repairs
Although not every major plumbing repair involves draining the entire system, it may be necessary in certain situations.
For instance, when installing a new bathroom in the basement, the existing pipes above may need to be drained before connecting the new lines.There can be a considerable amount of water stored in the pipes, which could spill out when the pipes are cut unless they are drained first.
Draining your home’s water supply pipes and filling them back up after the work is completed is a simple process.
What You'll Need
Equipment / Tools
Tubs and faucets
Materials
Cloth or plastic wrap (optional)
Instructions
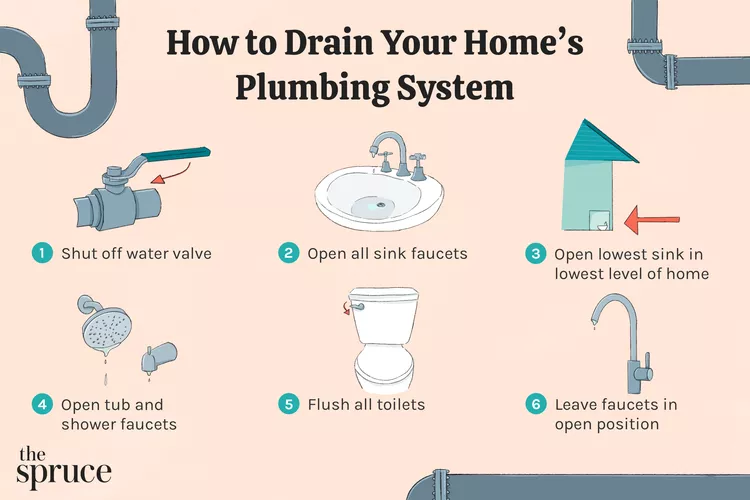
Shut Off the Water Valve
Turn off the main water valve at the water meter.
Open the Sink Faucets
Begin at the top floor and open all the sink faucets.
This allows air into the system, which helps the water flow as you drain it.
Open the Faucet in the Laundry Tub
Go to the basement or the lowest level of your home and open the faucet in your laundry tub or the lowest sink.
Let all the water from the upper floors drain out.
Open the Tub or Shower Faucets
Now, open all the tub and shower faucets.
Flush All Toilets
Flush all the toilets to empty the tanks.
Leave the Faucets in the Open Position
If you are leaving the property unattended, such as during the winter, leave the faucets open.
No water should come out of any of them except for a small drip from the lowest faucet as any leftover water in the pipes drains out.
When a home is left unattended for a long time, standing water in toilets, sink traps, tub drain traps, and floor drains can evaporate.
This removes the seal that keeps sewer gases from entering the home.Some experts suggest covering drains and toilet bowls with folded cloth or plastic wrap to prevent sewer gases from entering during long absences.If you are winterizing, it is essential to remove all water from toilets, toilet tanks, traps, and any areas where standing water might be present.When water freezes, it expands and can crack porcelain fixtures, traps, or appliance fittings.If the house is heated to a minimum, this step may not be necessary.However, if the heat will be turned off, you may also need to wrap the incoming water service with heat trace and insulation.
How to Charge the Pipes With Water
Reversing the process and filling all the pipes with water is a simple reversal of the steps you took to drain the system.
Close the Basement Faucet
Close the basement faucet or the lowest-level faucet in your home.
Close the Upper Faucets
Now, close all the upper faucets.
This allows air to stay in the pipes, helping to recharge the air chambers in your plumbing system.
Tip
It is a good practice to close all faucets except the lowest one, such as the laundry faucet in this case.
When you open or restore the system, it is advisable to open the main valve slowly, only halfway.Once you get a steady flow of water from the laundry faucet, close it and listen for the system to fill and become fully pressurized.This can be done by listening to the water flow.When the flow stops, you can fully open the valve.If it is a gate valve with a round handle, once it is fully open, turn it back a quarter turn.This is to prevent the valve from failing under pressure when it is reactivated.It also helps prevent the valve from getting stuck due to freezing in the future.
Open the Main Water Valve
Turn on the main water valve to let water flow back into your pipes.
Turn on the Faucets
One by one, starting with the highest-level faucets, turn on the faucets and let the air and water mix until only clear water flows from the faucet.
You may see discolored water at first, but this is normal.