

The Scale Stripper: How to Clear Faucet Aerators and Eradicate Hard Water Buildup
A sputtering, irregular stream of water from your kitchen or bathroom faucet is rarely a sign of a failing plumbing system or declining municipal water pressure. Instead, the culprit is almost always a microscopic, slow-moving construction project happening right at the tip of your spout.
Every day, tap water carries dissolved minerals—primarily calcium and magnesium—into your home. As water exits the spigot and evaporates, it leaves behind rock-hard mineral crusts known as scale, limescale, or calcium carbonate.
Over time, this chalky white buildup chokes the micro-screens inside your faucet's aerator, distorting the spray pattern and reducing water flow to a frustrating trickle. Worse, these damp, porous mineral shelves create the perfect hidden harbor for biofilm, mold, and mildew growth right where you wash your hands and dishes.
Fortunately, clearing this restriction does not require industrial chemicals or a plumbing overhaul. By leveraging basic household chemistry and targeted maintenance protocols, you can restore a flawless, high-velocity stream in less than an hour.
Technical Project Specifications
| Parameter | Metrics |
| Active Working Window | 10 to 15 minutes |
| Total Processing Duration | 40 to 45 minutes |
| DIY Skill Requirement | Beginner |
| Estimated Material Cost | $5 to $10 |
| Primary Active Cleaning Agent | Distilled White Vinegar (5% Acetic Acid) |
The Acid-Base Dissolution Mechanism
To clean a faucet head effectively without scratching its delicate finish, you need to understand the material you are trying to destroy. Limescale is essentially limestone. Trying to scrub it off with brute force or abrasive pads will permanently dull, scratch, or strip away decorative coatings like brushed nickel, oil-rubbed bronze, or polished chrome.
The professional solution relies on chemical dissolution using a mild, food-safe acid: standard distilled white vinegar. Vinegar contains roughly 5% acetic acid ($CH_3COOH$). When this acid comes into direct contact with the calcium carbonate ($CaCO_3$) making up the scale, a chemical reaction occurs.
The acid breaks the solid calcium down into water-soluble calcium acetate salts, while releasing carbon dioxide gas in the process. The rock-hard crust softens into a mushy, easily flushable slurry, completely freeing the clogged pathways within the fixture without harming the metal housing beneath.
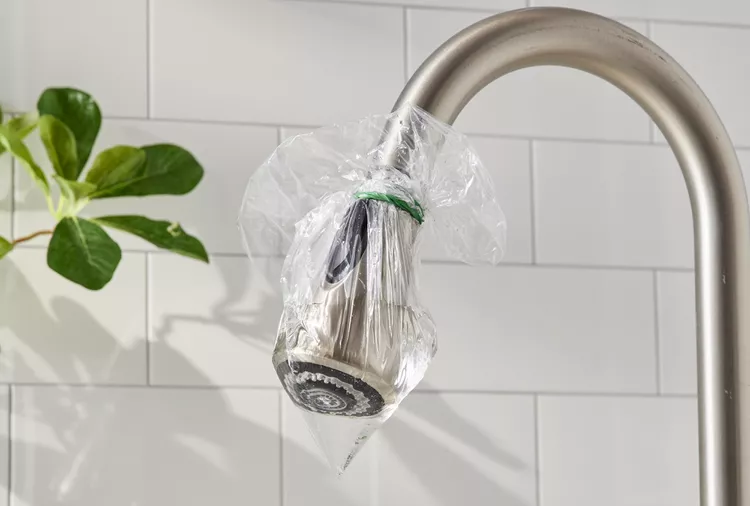
The Passive Saturation Method (The Bag Hack)
If your faucet head does not easily detach, or if you want to clean the entire external housing alongside the internal screen, the passive saturation method is the cleanest, most efficient strategy.
The Saturation Step-by-Step
Deep Cleaning an Aerator Assembly
While the bag hack cleans the exterior surfaces brilliantly, severe clogs trapped deep within the internal screen array require a mechanical breakdown. The aerator is a multi-layered assembly threaded directly into the absolute tip of the spout.
Removal and Disassembly Tactics
To clear deep internal scaling, you must carefully remove the assembly:
-
Extract the Housing: Attempt to unscrew the metal Aerator Body / Housing at the very tip of the spout by turning it counterclockwise by hand. If it is locked tight by mineral scale, do not use bare metal pliers, which will instantly gouge the metal. Instead, wrap a thick layer of masking tape or a rubber strip around the collar, then gently grip it with pliers to break the scale lock.
-
Organize the Internal Components: Carefully push the internal components out of the metal sleeve. Lay them out on a clean towel in the exact sequence they came out. As shown in the architectural layout above, a standard aerator consists of a rubber Washer, a plastic Flow Restrictor, an internal mixing Screen, a central Mixer, an secondary Screen / Flow Director, and an Outer Housing basket.
-
The Target Treatment: Drop these small plastic and wire components into a small cup of pure white vinegar or a dedicated calcium-lime remover (CLR). Let them soak for 20 minutes. Use a pin, paperclip, or toothpick to clear out any hard sand or rust flakes trapped inside the micro-meshes of the Screen or the ports of the Flow Restrictor.
-
Reassembly Validation: Rinse every individual component thoroughly under clean water. Nest the parts back into the Outer Housing and Aerator Body exactly as they were removed. Thread the unit back onto the spout clockwise, ensuring the top rubber Washer sits perfectly flat to prevent side-spraying leaks. Hand-tighten firmly.
Alternative Cleaning Methodologies Matrix
If white vinegar is unavailable, or if you are managing unique architectural finishes, substitute the soak with one of these approved alternative techniques.
| Maintenance Method | Operating Principle | Best For | Risk Factor |
| Thermal Steam Disruption | High-temperature pressurized vapor expands and fractures the crystalline mineral bonds. | Modern pull-down kitchen sprayers with complex internal toggle switches. | Low: Safe for all metallic and matte-black finishes; avoids chemical exposure entirely. |
| Surfactant Scrub | Warm water blended with highly concentrated liquid dish soap lifts surface oils and light dust. | Regular weekly or bi-weekly surface touch-ups. | Zero: Completely non-corrosive, though ineffective against heavy, calcified stone deposits. |
| Commercial De-Scaler (CLR) | Saturated sulfamic or gluconic acid rapidly digests heavy mineral matrices. | Extreme, historical scale build-ups that resist mild vinegar treatments. | Moderate: Can etch or discolor specialized finishes if left to dwell past the recommended time. |
Proactive Preservation Protocols
The secret to maintaining perfect water pressure and pristine fixtures is preventing heavy mineral crystallization from occurring in the first place.
-
Establish a Bi-Annual Schedule: Mark your calendar to run the passive vinegar bag hack once every six months, or every three months if your local municipality is known for exceptionally hard water.
-
Implement the Post-Use Wipe: Keep a small microfiber cloth stowed near the sink base. Get into the habit of wiping down the spout rim after running heavy loads of dishes or cleaning up. Removing the standing water drops before they can evaporate prevents the mineral solids from dropping out of solution and building scale layers.
-
Replace the Core Yearly: Faucet aerators are inexpensive utility components. If an internal screen becomes warped, torn, or permanently scaled over after years of use, do not waste energy trying to save it. Take the old unit to your local hardware store, match the thread pattern, and install a fresh, high-efficiency replacement insert to instantly restore factory-standard performance.