

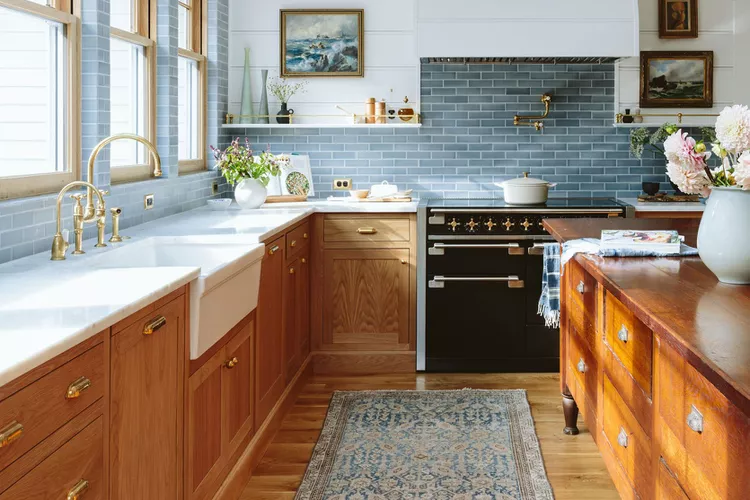
If your kitchen is currently anchored by heavy, honey-toned oak cabinets, you are probably very familiar with the design dilemma they present. On one hand, these cabinets are often incredibly well-constructed from solid, durable hardwood that puts modern particle-board alternatives to shame. On the other hand, their distinct orange-yellow undertones and traditional cathedral arch patterns can make your entire home feel firmly stuck in the late 1990s.
The good news? You do not need to spend tens of thousands of dollars ripping out perfectly functional wood boxes to achieve a sleek, contemporary kitchen. With a little creativity, strategic DIY effort, and a realistic budget, you can radically transform the aesthetic of your space.
Here are eight highly effective, budget-friendly strategies to modernize your oak kitchen cabinets while keeping your bank account intact.
1. The Instant Upgrade: Swap Out the Hardware
Never underestimate the transformative power of jewelry for your cabinets. Many older oak kitchens feature outdated polished brass loops or basic wooden knobs that blend directly into the wood grain. By simply replacing these old pieces with modern hardware, you can instantly shift the design narrative of the room.
Selecting the Right Finish
The finish you choose will dictate the overall vibe of your updated kitchen:
-
Matte Black: Provides a sharp, high-contrast look that grounds the warmth of the oak and leans into a modern farmhouse or industrial aesthetic.
-
Champagne Bronze: Offers a soft, luxurious warmth that complements the wood without mimicking the dated, brassy tones of decades past.
-
Sleek Chrome or Brushed Nickel: Introduces a clean, cool-toned contrast that pulls the kitchen into a contemporary, transitional style.
Pro-Tip: If you are changing the size of your hardware (for example, moving from a 3-inch pull to a 5-inch pull), you will need to fill the old screw holes with wood filler, sand them smooth, and touch them up before installing the new hardware. Alternatively, look for adjustable pulls or hardware with backplates that cleverly hide the original holes.
2. Refinish with Intention: Paint or Stain
If you want a dramatic transformation, modifying the actual surface color of the wood is your best bet. Because oak has a prominent, deep grain pattern, you have two distinct paths depending on how much of that natural texture you want to see.
The Painting Route
Painting oak cabinets is a labor of love, but the payoff is immense. To ensure your hard work lasts, always use a high-quality primer designed to block wood tannins, followed by a durable semi-gloss or satin cabinet paint. These sheens are highly resistant to moisture, grease, and frequent wiping. Dark, moody hues like charcoal gray, navy blue, or forest green look stunning on oak, as do crisp, clean whites and warm creams.
The Staining Route
If you love the natural beauty of wood but hate the orange undertone, consider a gel stain. Gel stains sit on top of the wood rather than soaking deeply into it, making them perfect for darkening existing finishes. A deep espresso or a weathered gray stain can neutralize the brassy warmth while letting the gorgeous, organic texture of the oak grain take center stage.
3. The Middle Ground: Cabinet Refacing
If your cabinet doors are warped, damaged, or feature an outdated arched profile that you simply cannot stand, painting them might not be enough. However, completely replacing the entire cabinet structure is still unnecessary. Enter cabinet refacing.
Refacing bridges the gap between a cheap cosmetic fix and a full-scale demolition. In this process, you completely remove the old cabinet doors and drawer fronts, leaving the sturdy structural "boxes" intact. You then apply a new veneer or paint to the visible face frames of the boxes to match your brand-new doors.
By purchasing new, unfinished Shaker-style doors online and painting or staining them yourself alongside the existing frames, you can achieve the look of a brand-new, high-end custom kitchen at a fraction of the cost of a full remodel.
4. Open Up Your Space: Remove the Doors Entirely
One of the most affordable ways to break up a heavy wall of monotonous wood grain is to embrace open concept shelving by simply removing the cabinet doors. This trick instantly makes small kitchens feel larger, airier, and more dynamic.
How to Style Open Cabinetry
To keep this look functional rather than chaotic, follow these organizational guidelines:
-
Curate Your Items: Only display items you use frequently, such as matching everyday dinnerware, clear glass jars filled with dry goods, or uniform coffee mugs. This keeps dust from settling on unused items.
-
Create Visual Interest: Paint or wallpaper the interior back wall of the open cabinet. A crisp white background will make your dishes pop, while a subtle geometric pattern adds unexpected personality.
-
Embrace the Rules of Styling: Group items in odd numbers, vary the heights of your stacks, and leave plenty of "negative space" so the shelves don't look overcrowded.
5. Shift the Focus: Repaint the Surrounding Walls
Sometimes, the best way to change how your cabinets look is to change the environment around them. The color of your kitchen walls plays a massive role in how the undertones of your oak cabinets behave. If your walls are currently painted beige or tan, they are likely exaggerating the orange hues in the wood.
Choosing Complementary Wall Colors
-
Cool Whites and Grays: Crisp, cool-toned backgrounds create a sharp contrast that makes the warm wood feel intentional, rich, and modern.
-
Earthy Greens and Muted Blues: Shades like sage, olive, or slate blue act as natural complements to orange on the color wheel. They tone down the brassiness of the oak and create a calm, organic, nature-inspired palette.
6. Draw the Eye: Install a Show-Stopping Backsplash
A high-impact backsplash serves as the ultimate visual distraction. By introducing a stunning vertical element right at eye level, you draw attention away from the expansive wood grain of the cabinetry and redirect it toward a beautiful design focal point.
If you are working with a tight budget or renting your space, look into modern peel-and-stick tiles. High-quality vinyl or composite tiles now realistically mimic the look of genuine marble, subway tile, and colorful Moroccan ceramics without the mess of mortar and grout. For a more permanent update, a classic white subway tile with a dark gray grout provides a timeless, budget-friendly backdrop that instantly modernizes any style of woodwork.
7. Modernize the Vibe: Upgrade Your Appliances
An old, cream-colored refrigerator or a mismatched black dishwasher can make even the most beautiful oak cabinets look dated. Investing in updated appliances can completely revolutionize the visual context of your kitchen.
You don't necessarily have to buy everything brand new all at once. Upgrading to sleek stainless steel or trendy fingerprint-resistant black stainless steel can immediately elevate the kitchen's aesthetic. If your budget is extra tight, look into appliance epoxy paint or stainless steel contact paper to temporarily refresh the exterior of your existing, working appliances.
8. Layer Your Lighting: Brighten the Shadows
Old kitchens often suffer from poor lighting, usually relying on a single, harsh fluorescent ceiling fixture that casts deep shadows under the cabinets and makes natural wood look dingy. By layering different types of light, you can completely change the atmosphere of the room.
┌──────────────────────────────┐ │ THE KITCHEN LIGHTING TRIO │ └──────────────┬───────────────┘ │ ┌───────────────────────┼───────────────────────┐ ▼ ▼ ▼ ┌─────────────────┐ ┌─────────────────┐ ┌─────────────────┐ │ TASK LIGHTING │ │AMBIENT LIGHTING │ │ ACCENT LIGHTING │ │ Under-cabinet │ │ Flush-mounts & │ │ Pendant lights │ │ LED strips to │ │ recessed cans to│ │ over islands to │ │ illuminate countertops│ flood the room │ │ add personality │ └─────────────────┘ └─────────────────┘ └─────────────────┘
Adding affordable, stick-on LED puck lights or plug-in light strips beneath your upper cabinets is a weekend project that yields massive results. It eliminates dark corners, illuminates your countertops, and gives the entire kitchen a high-end, custom-designed feel. Pair this with a statement pendant light over the sink or island to anchor the space and tie your new design together.