

Safeguarding Your Pipes: The Ultimate Comprehensive Guide to Testing Residential Water Pressure
First, a quick sanity check: while the old label on this project might whisper "faucet leaks," any seasoned plumber will tell you that tracking down structural failures always begins with the invisible powerhouse hidden behind your drywall—your home's volumetric water pressure. Excessive system pressure is the primary structural catalyst for ruptured faucet cartridges, weeping pipe joints, and catastrophic appliance failures.
We easily remember to clean our gutters, swap out HVAC filters, and sweep out the dryer vent, yet we routinely ignore the immense hydraulic energy pulsing through our household pipes. Incorporating a quick water pressure evaluation into your bi-annual property maintenance regimen is one of the most proactive, cost-effective habits you can adopt. It takes less than a quarter of an hour, costs next to nothing, and serves as an early warning radar system for your entire domestic infrastructure.
Many modern properties are outfitted with a dedicated Pressure Reducing Valve (PRV), also known as a water pressure regulator. This bell-shaped brass mechanism acts as a gatekeeper, intercepting the high-velocity, erratic water delivery from the municipal main line and throttling it down to a safe, consistent velocity before it hits your internal plumbing. Regularly monitoring your system guarantees that this regulator hasn't silently failed, saving your home from catastrophic line blowouts.
Project Overview
-
Active Labor Time: 10 minutes
-
Total Elapsed Time: 10 to 15 minutes
-
DIY Skill Level: Absolute Beginner
-
Estimated Financial Outlay: $10 to $15 (The cost of a basic analog gauge)
Decoding the Hydraulics: The Optimal Pressure Zone
Domestic water pressure is measured globally in psi, or pounds per square inch. To keep your household infrastructure running smoothly, you need to target a specific range that balances modern convenience with long-term pipe preservation.
| Pressure Range | Classification | Behavioral Impact & Structural Risk | Action Required |
| Below 40 psi | Deficient | Trickling showers, sluggish faucet streams, and painfully slow appliance fill cycles. | Contact water utility or check well pump settings. |
| 40 to 60 psi | The Optimal Zone | Excellent delivery volume, crisp shower performance, and perfectly safe parameters for all pipes. | None. This is the ideal operational sweet spot. |
| 61 to 75 psi | Acceptable Max | robust output; standard residential pressure regulators allow this upper threshold safely. | Monitor closely during seasonal utility shifts. |
| 76 to 80+ psi | Dangerous Surge | High risk of split flex lines, damaged water heaters, running toilets, and voided appliance warranties. | Immediate installation or replacement of a PRV. |
Operating your home in the high-velocity zone above 80 psi is the plumbing equivalent of living with chronic high blood pressure. Your pipes may seem perfectly fine on the surface, but the constant, elevated hydraulic stress is steadily degrading every rubber washer, braided flex line, and internal valve cartridge across your entire floor plan.
Conversely, drop below the 40 psi mark, and while your pipes will be completely safe, your daily quality of life takes a hit. Washing machines take double the time to finish a cycle, eco-friendly dishwashers fail to clean effectively, and your morning shower turns into a frustrating, weak trickle.
The Diagnostics Kit
You do not need a truck full of commercial tools to pull an accurate hydraulic reading. Simply head to your local hardware store or browse online for a dedicated utility pressure gauge.
🛠️ Tool Spotlight: Choosing the Right Gauge
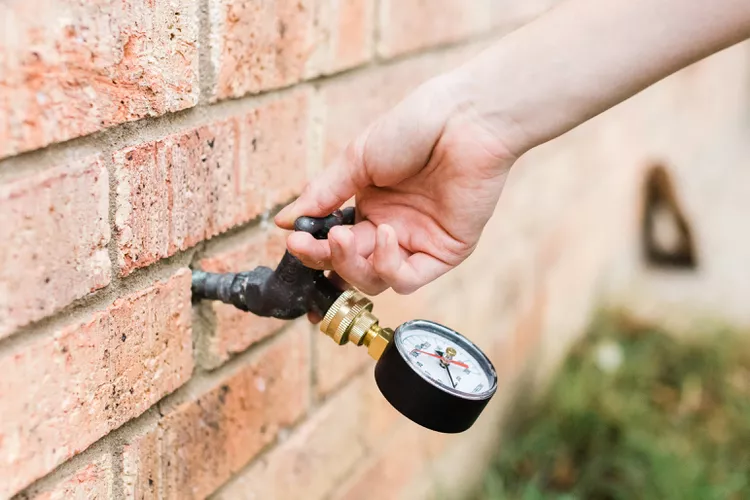
Look for an analog testing gauge featuring a standard 3/4-inch female garden hose thread (GHT) connection. This specialized threading allows you to spin the tool directly onto standard outdoor spigots or washing machine utility bibbs without needing any intermediary adapters. For the most accurate diagnostics, select a gauge with a dual indicator needle setup: one black needle to show real-time pressure, and one red "lazy" needle that stays pushed to the maximum surge point, capturing hidden overnight utility pressure spikes.
Items to Gather:
-
Standard 3/4-inch GHT utility water pressure gauge
-
A pair of tongue-and-groove pliers (for stubborn, corroded spigot connections)
-
A clean microfiber rag to clear debris from threads
-
A small bucket or hand towel (if testing indoors at the laundry station)
Step-by-Step Testing Sequence
To guarantee an flawless, mathematically accurate baseline reading, you must eliminate all dynamic fluid variables inside the home. Follow this systematic process to secure an accurate snapshot of your static system pressure.
Step 1: Establish a State of Total Static Isolation
Before you thread your testing gauge onto any utility fixture, you must ensure that there is absolutely zero active water movement anywhere across your property. If water is moving through the pipes while you test, you will register a dynamic pressure reading, which is artificially lower than the true baseline resting pressure.
Walk through your floor plan and double-check that the following systems are completely idle:
-
Washing machines and dishwashers are not mid-cycle.
-
No one is running a bathroom faucet, flushing a toilet, or taking a shower.
-
Exterior lawn sprinklers, drip irrigation lines, and automated garden hoses are shut down.
-
Refrigerators equipped with automatic ice makers or integrated water dispensers are temporarily paused or left unutilized during the 10-minute test window.
Step 2: Target the Primary Intake Spigot
Your goal is to test the water as close to its point of entry into the property as physically possible. If your home runs on municipal water, locate the outdoor hose bibb situated closest to the main water meter box out front. If your property draws from a private well system, target the spigot directly adjacent to your interior bladder pressure tank.
Look for a spigot fed by a thick, heavy supply line—ideally a half-inch to one-inch diameter copper or PEX line. This ensures you are measuring the direct strength of the main infrastructure before it gets distributed and throttled down by smaller 3/8-inch branch lines upstairs.
[Main Municipal Line] ──► [Water Meter / PRV] ──► [TARGET SPIGOT] ──► [Interior Plumbing Network] Step 3: Secure the Testing Apparatus
Clear away any cobwebs, dried mud, or mineral crust from the external threads of the chosen hose bibb using your rag.
-
Thread the female collar of the water pressure gauge onto the male threads of the spigot by hand, turning it clockwise.
-
Ensure the inner rubber sealing gasket inside the gauge sits perfectly flat against the mouth of the spigot.
-
Once hand-tight, take your tongue-and-groove pliers and give the metal collar an extra quarter-turn to lock in a completely airtight, leak-free seal. If water sprays out of the connection during the test, your reading will be compromised.
Step 4: Engage the Valve and Analyze the Metrics
With the gauge securely mounted, slowly rotate the spigot’s handle completely counterclockwise until the valve is wide open. Listen for the initial rush of water filling the small chamber of the gauge.
Look directly at the needle face. Allow the indicator to stabilize for roughly 30 seconds, then note the final resting number.
-
If the dial registers between 40 and 60 psi: Your home is operating within optimal parameters.
-
If the dial plummets below 40 psi: You are dealing with a supply deficiency. If you are on a well system, your pressure switch likely needs calibration. If you are on city water, contact your municipal provider; they may need to adjust their local street transformers, or your home's independent PRV might be jammed shut, restricting flow.
-
If the dial sails past 75 or 80 psi: Turn the water off immediately. Your home lacks a functional pressure regulator, or the existing valve's internal diaphragm has ruptured, exposing your delicate internal plumbing to unregulated street surges.
Once you have recorded the numbers, close the spigot handle completely, slowly unthread the gauge (expect a small, harmless spray of trapped water to release from the collar), and store the tool away for your next bi-annual check.
The Indoor Alternative: Testing at the Laundry Station
If you live in a multi-family apartment complex, a urban condo, or a home lacking accessible exterior hose bibbs, you can easily pull an equally accurate reading from your laundry room infrastructure.
┌─────────────────────────────┐ │ SHUT OFF COLD WATER VALVES │ └──────────────┬──────────────┘ ▼ ┌─────────────────────────────┐ │ DISCONNECT WASHING MACHINE │ │ HOSE (PLACE TOWEL BELOW) │ └──────────────┬──────────────┘ ▼ ┌─────────────────────────────┐ │ THREAD PRESSURE GAUGE ONTO │ │ EXPOSED COLD WATER TAP │ └──────────────┬──────────────┘ ▼ ┌─────────────────────────────┐ │ OPEN VALVE FULLY TO CHECK │ │ DIAL METRICS │ └─────────────────────────────┘ Because the cold water supply feeding your washing machine connects directly to the home's main distribution manifold, it serves as an excellent internal diagnostic hub.
Simply slide your washing machine forward to access the utility box recessed into the wall behind it. Rotate the dedicated cold water valve (typically color-coded blue) completely off. Place a small towel or shallow container directly beneath the hose connection to catch the localized water volume trapped inside the line, then disconnect the washing machine supply hose from the wall bibb.
Thread your pressure gauge directly onto that newly exposed cold water tap, tighten it securely with your pliers, and open the valve handle completely to capture your internal system metrics. Once finished, close the valve, replace the appliance line, and ensure it is tightened properly to prevent any laundry room drips.
Technical Troubleshooting: Restoring Structural Equilibrium
If your semi-annual inspection reveals that your home is operating outside the safety zone, don't ignore the findings. Use this targeted roadmap to guide your repair strategy:
The High-Pressure Fix
If your system reads above 75 psi, check your main water entry line to see if a Pressure Reducing Valve is already installed. If you find one, the internal spring or rubber diaphragm has likely failed due to age. Most PRVs feature an adjustable bolt on top; tightening the bolt increases pressure, while loosening it lowers it. Try adjusting the bolt while your gauge is attached to see if the pressure drops. If the needle remains frozen regardless of adjustment, the valve is dead and must be replaced by a professional plumber.
The Low-Pressure Fix
If your system registers a weak reading below 40 psi on a municipal line, first check the main water meter valve out by the street curb. Sometimes, city technicians open these valves only halfway after performing maintenance, accidentally throttling your home's supply. If that valve is wide open, call your city utility department. They can check if a neighborhood water main break is causing a localized pressure drop, or send a technician to test the water pressure at the street side of your meter.